NOTE:
- The Custom Domain feature is ONLY for websites hosted on Nicepage.
- It takes from 6 to 72 hours to apply the changes.
- You can have ONLY ONE IP in the A-record and NO AAAA records for your domain or subdomain root.
- The verification is not supported for the Cloudflare domains.
Summary
- Overview
- Registrar Domain Settings
- Domain A Record
- Subdomain A Record
- Insecure Website Message
- Assign Custom Domain
- Change Custom Domain
- Publish Website
- Verify Custom Domain
- Custom Domain Dialog
Overview
To use this feature, you must have a premium plan. If you have a purchased domain name, you can connect it to your Nicepage-hosted website.
Registrar Domain Settings
Please go to the Domain Settings on the Registrar website where you have registered the Domain itself, for example, Godaddy, HostGator, Amazon Route 53, Namecheap, etc.
Set up your Domain Name to point to the Nicepage network.
- Go to the Registrar Control Panel of your Domain.
- In the Settings, find something like "Add a record to DNS."
- Enter one of the following or both A Records.
- Check if there is an AAAA record for your Domain. Please remove it.
Domain A Record
Add a type A record with an empty Host (Hostname) and the IP address 35.157.174.232
NOTE: The Host Setting or Hostname for hosting companies may differ. In some cases, you should use @ instead of empty filed. If you already have a blank or @ A record, you need to change it.
Example:
Subdomain A Record
For a subdomain (for example, sub.mysite.com, www.mysite.com), add an A record with the IP address 35.157.174.232 and your subdomain (e.g., sub or www) in the host (hostname) filed.
Insecure Website Message
If you want to use WWW, set up both WWW and @ record. If you don't, your site may appear insecure. Your visitors may see an "Insecure website" message, and browsers may prevent access to your website.
Please refer to the domain name registrar's instructions or contact their support service if you encounter any issues.
IMPORTANT! It takes from 6 to 72 hours to apply the changes!
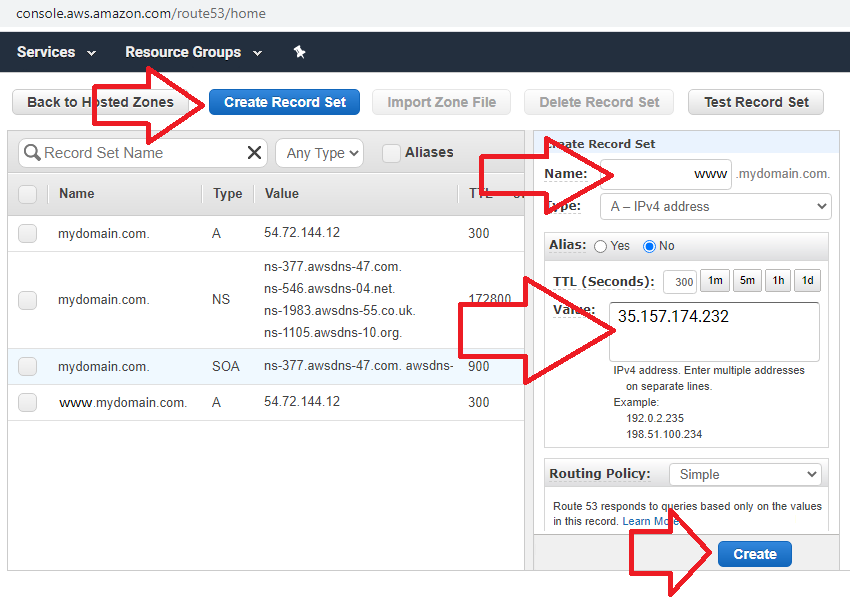
The screenshots below show how to do this for Amazon Route53 for a domain. There is an empty Name filed and subdomain "WWW.mydomain.com."
Another Example
IMPORTANT!
If you add a WWW record in your registrar/DNS control panel after assigning a domain in the Site Settings (Online Builder or Application), you must do the following.
- Open the Site Settings.
- Remove your Domain in the General Tab.
- Click Done.
- Reopen the Site Settings.
- Reenter the domain name.
- Click Done.
Assign Custom Domain
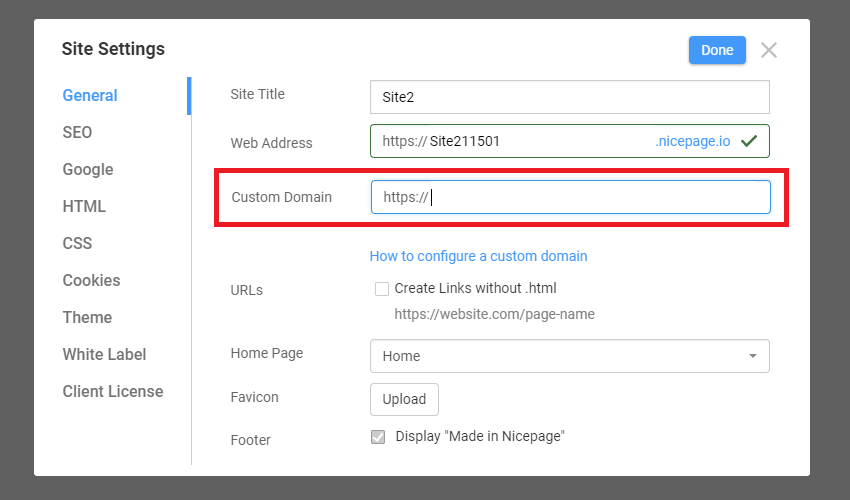
In the Nicepage Application or Online Editor, go to Site Settings -> General Tab and enter the domain name into the "Custom Domain" field. For instance, mydomain.com. Click Done.
Change Custom Domain
You can change the Custom Domain in the Site Settings -> General Tab.
- In the dialog, go to the Domain Name field.
- If you change one Domain to another, the Domain is reassigned after you save the Site Settings.
- If you clear the domain name field, you unbid the domain name after you save the Site Settings.
- There is no need to republish your website.
Publish Website
Click the "Publish and Preview" button on the Top Bar to publish your website. Your website will be available at the assigned domain address within 6 - 72 hours.
Verify Custom Domain
NOTE: The verification is not supported for the Cloudflare domains.
You can test the connection to your custom domain in the Publish Success dialog. If your domain check is successful, you will see the success message.
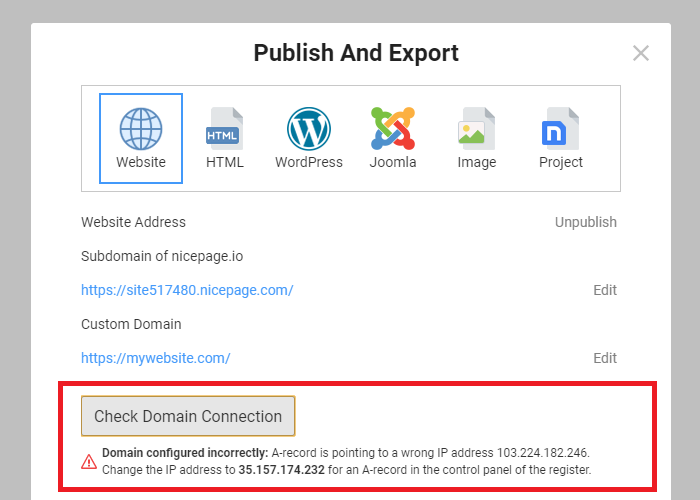
Before publishing, you can also check the custom domain assignment in the Publish and Export dialog. The following is an example of an error message.
Custom Domain Dialog
In the Publish And Export dialog, you can click the Configure button to open a separate dialog to edit your Custom Domain settings.
![custom-domain-dialog.gif]()
### NOTE:
1. The Custom Domain feature is **ONLY for websites hosted on Nicepage**.
2. It takes **from 6 to 72 hours** to apply the changes.</span>
3. You can have **ONLY ONE IP in the A-record** and **NO AAAA records** for your domain or subdomain root.
4. The verification is not supported for the **Cloudflare** domains.
## Summary
- Overview
- Registrar Domain Settings
- Domain A Record
- Subdomain A Record
- Insecure Website Message
- Assign Custom Domain
- Change Custom Domain
- Publish Website
- Verify Custom Domain
- Custom Domain Dialog
## Overview
To use this feature, you must have a [premium plan](/premium). If you have a purchased domain name, you can connect it to your Nicepage-hosted website.
## Registrar Domain Settings
Please go to the **Domain Settings** on the **Registrar website** where you have registered the Domain itself, for example, Godaddy, HostGator, Amazon Route 53, Namecheap, etc.
Set up your Domain Name to point to the Nicepage network.
1. Go to the **Registrar Control Panel** of your Domain.
2. In the **Settings**, find something like "Add a record to DNS."
3. Enter one of the following or both **A Records**.
4. Check if there is an AAAA record for your Domain. Please remove it.
##
### Domain A Record
Add a type **A record** with an empty Host (Hostname) and the IP address **35.157.174.232**
NOTE: The Host Setting or Hostname for hosting companies may differ. In some cases, you should use @ instead of empty filed. If you already have a blank or @ **A** record, you need to change it.
*Example:*
!a-record-godaddy.png!
### Subdomain A Record
For a subdomain (for example, *sub.mysite.com, www.mysite.com*), add an A record with the IP address **35.157.174.232** and your subdomain (e.g., sub or www) in the host (hostname) filed.
!ex1-1.png!
### Insecure Website Message
If you want to use **WWW**, set up both WWW and @ record. If you don't, your site may appear insecure. Your visitors may see an "Insecure website" message, and browsers may prevent access to your website.
Please refer to the domain name registrar's instructions or contact their support service if you encounter any issues.
<span style="color:#CC0000">**IMPORTANT!** It takes from 6 to 72 hours to apply the changes!</span>
The screenshots below show how to do this for Amazon Route53 for a domain. There is an empty **Name** filed and subdomain "WWW.mydomain.com."
!ex1-2.png!
*Another Example*
!a-record-www-godaddy.png!
<span style="color:#CC0000"> **IMPORTANT!**</span>
If you add a WWW record in your registrar/DNS control panel **after assigning a domain** in the Site Settings (Online Builder or Application), you must do the following.
1. Open the Site Settings.
2. Remove your Domain in the General Tab.
3. Click Done.
4. Reopen the Site Settings.
5. Reenter the domain name.
6. Click Done.
##
## Assign Custom Domain
In the **Nicepage Application** or **Online Editor**, go to Site Settings -> General Tab and enter the domain name into the "Custom Domain" field. For instance, *mydomain.com*. Click **Done**.
!custom-domain.png!
## Change Custom Domain
You can change the Custom Domain in the Site Settings -> General Tab.
1. In the dialog, go to the Domain Name field.
2. If you change one Domain to another, the Domain is reassigned after you save the Site Settings.
3. If you clear the domain name field, you unbid the domain name after you save the Site Settings.
4. There is no need to republish your website.
##
## Publish Website
Click the "Publish and Preview" button on the Top Bar to publish your website. Your website will be available at the assigned domain address within 6 - 72 hours.
!custom-domain2.png!
## Verify Custom Domain
**NOTE:** The verification is not supported for the Cloudflare domains.
You can test the connection to your custom domain in the Publish Success dialog. If your domain check is successful, you will see the success message.
!check-domain-publish-success.png!
Before publishing, you can also check the custom domain assignment in the Publish and Export dialog. The following is an example of an error message.
!check-domain-publish-failure.png!
## Custom Domain Dialog
In the Publish And Export dialog, you can click the Configure button to open a separate dialog to edit your Custom Domain settings.
!custom-domain-dialog.gif!
##


